SLA Matrix
The SLA Matrix defines Service Level Agreement targets for tasks by creating rules that automatically apply response and resolution time-frames based on matching criteria.
How to Build Your Matrix: Drag Components from the left panel (such as Priorities, Issue Types, Buildings, or Contracts) into the tree structure to create matching rules. Each rule can combine multiple criteria to define when specific SLA targets should apply.
Setting Time Targets: For each rule, enter time-frames using simple formats like "2h" (2 hours), "4d" (4 days), or "15m" (15 minutes). You can set up to five different target types:
- Respond - Time for helpdesk to assign the task to a resource
- Attend - Time for resource to arrive on site
- Contain - Time to implement a temporary fix
- Fix - Time to complete the task
- User - Custom target for your specific requirements
How Matching Works: The matrix evaluates from top to bottom and applies the first matching rule. For example, a rule for "Priority 1 + Emergency Repairs + Critical Buildings" with targets Respond: 15m, Attend: 1h, Fix: 4h will apply to any task that matches all three criteria.
Practical Benefits: Automate SLA enforcement so matching tasks receive appropriate targets without manual entry. Track compliance by monitoring whether targets were met based on Time Record dates. Plan resources effectively by understanding expected service levels for different task categories.
Best Practice: Build comprehensive matrices covering all Priority and Issue Type combinations, with progressively longer time-frames for lower priorities. This ensures every task receives appropriate service level expectations.
Available from 6.2.0.0
The usability of the SLA Editor has been improved as follows:
-
The three window components can be re-sized by users, the re-sized windows are persisted
-
The Toolbar has been updated as follows:
-
Text labels have been added to the toolbar buttons
-
The toolbar buttons have been re-organised in order to make them consistent with other areas of MRI Evolution
-
New toolbar buttons for Expand All and Collapse All nodes in the SLA Matrix tree
-
New toolbar button to launch the new SLA Matrix SLA-MT001 report
-
A number field has been added to the toolbar between the Previous Page and Next Page buttons. Users can enter a number in this box to jump straight to the selected page number. The control works in a similar way to the page number box in the footer of Grids
-
-
Performance issues related to changing pages and saving have been resolved
 Available from 7.0.0.0
This function will now open in the same window as MRI Evolution, instead of a separate window, by default.
Users will still have the option to open the function in a separate window.
Either the Close ![]() button will be hidden and the Open in new window
button will be hidden and the Open in new window ![]() button will be displayed or vice versa, depending on whether the page is opened in a page of its own, or not.
button will be displayed or vice versa, depending on whether the page is opened in a page of its own, or not.
Settings > Service Level Agreements > SLA Editor > SLA Editor
The link will open the SLA window.
To configure your SLA Matrix, add or edit rows to define criteria and targets that match your business needs. Ensure your team understands each target and how it is measured in the system for accurate reporting and compliance.
Components Menu - Window 1
Components
Components menus can be expanded and collapsed to display entities.
Searching for Components
At the top of the Components Menu there is an input box that can be used to find specific values for systems that have large quantities of data.
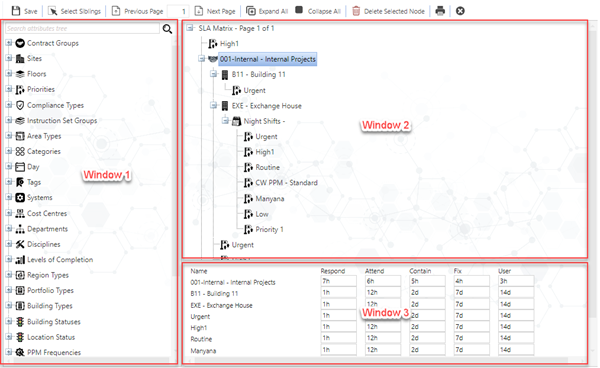
Adding Components - Window 2
Adding Components
Left click and hold your entity. Drag it onto the right hand side over the value SLA Matrix
When the value SLA Matrix is underlined release the mouse button
Your entity will appear in the matrix
From the components menu click the Siblings button, all the entities will now be selected and can be dragged into the matrix
Removing Entries from the SLA Matrix
If values have been entered by mistake or in the wrong place then they will need to be removed. This can be done by highlighting the node and clicking Delete ![]() .
.
Entering SLA time Values - Window 3
Below the Matrix tree is the SLA Times pane. Selecting a value in the SLA Matrix will display an entry box for that node and those immediately below it.
Time values can be entered using the following convention, where {x} is a whole number:
{x}m - Minutes
{x}h – Hours
{x}d – Days
{x}w – Weeks
{x}M – Months
{x}Y – Years
{x}CW - Calendar Weeks
{x}CM - Calendar Months
{x}CY - Calendar Years
{x}p = Periods
{x}EOW - End of Week Available from 5.7.0.0
{x}EOM - End of Month Available from 5.7.0.0
For the End of Month and End of Week time values, the {x} number can be 0 (you can have 0EOW and 0EOM) which will produce targets at the end of the same week or month as the TA_DUE_DATE of the Task.