Widget - Helpdesk
Customizable widget enabling helpdesk call logging with configurable field assignments, default values, exclusions, and document upload support. Multiple widgets support role-specific helpdesk configurations with context help and auto-population capabilities.
 Available from 7.0.0.0
The Licence restrictions for document uploads by Evolution Reach users have been removed—this capability is now included in the base MRI Evolution system.
Settings > Widgets & Home Pages > Widgets > Widget - Helpdesk
The link will open the Widgets grid. It is a grid view which can be searched, sorted and customised as normal.
To add a new Widget click New ![]() , to edit an existing Widget click Edit
, to edit an existing Widget click Edit ![]() . A pop up window will appear which will allow the creation or amendment of a Widget.
. A pop up window will appear which will allow the creation or amendment of a Widget.
Select the Widget template : Helpdesk. Complete the fields and click Save ![]() . Click Configure Widget
. Click Configure Widget ![]() .
.
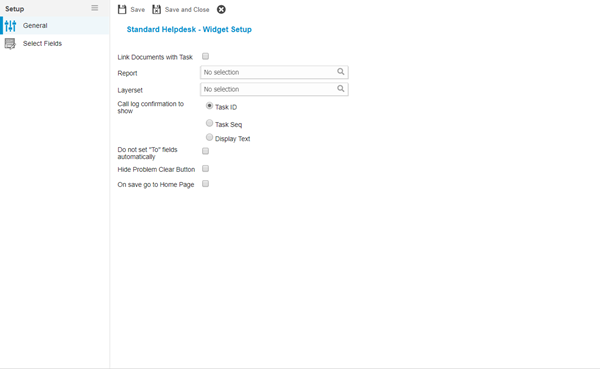
 Click to view - Widget Set up Fields and Descriptions
Complete the fields and click Save ![]() . Fields can now be assigned to the Helpdesk via the sub navigation Select Fields
. Fields can now be assigned to the Helpdesk via the sub navigation Select Fields
Select Fields
Select fields allows the User to define which fields a Evolution Reach User will be able to see and if any of them have default information
Settings > Widgets & Home Pages > Widgets > Widget - Helpdesk
The link will open the Select Fields grid. It is a grid view that can be customised and sorted as normal.
To assign Fields click Assign ![]() , entities in the right hand assignment window are connected.
, entities in the right hand assignment window are connected.
The order of the Fields can be adjusted using Move Up ![]() and Move Down
and Move Down ![]() .
.
Once Fields have been assigned the Fields Setup can be configured. Double click the field to configure.
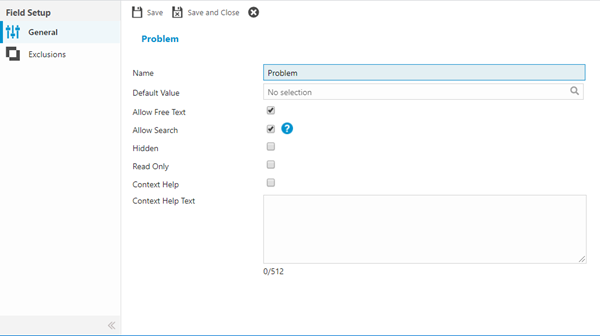
Click to view - Fields Set Up Fields and Descriptions
Exclusions
Values can be excluded from the Helpdesk, these excluded values need to be assigned via sub navigation Exclusions.
Settings > Widgets & Home Pages > Widgets > Widget - Helpdesk
The link will open the Exclusions grid. It is a grid view that can be customised and sorted as normal.
To assign Exclusions click Assign ![]() , entities in the right hand assignment window are connected.
, entities in the right hand assignment window are connected.
Complete the fields and click Save and Close ![]() .
.
If Excitech is licensed and a Location has been added to the Widget, a hyper link to the floor plan will be seen in the Widget under Location.